Old Fashioned Tuna Loaf Meatloaf Recipe
There’s something magical about meals that remind us of family dinners. The old fashioned tuna loaf meatloaf is a favorite in American homes. It’s a mix of old charm and new convenience, perfect for busy nights.

Table of Contents
old fashioned tuna loaf meatloaf
This recipe uses simple ingredients you probably have at home. It’s a way to make a comforting dinner that’s easy to prepare. It’s a timeless classic that families love.
When you make this dish, you’re part of a long tradition of home cooking. This guide will make the process easy and fun for your family.
Key Takeaways
- Discover the enduring appeal of a classic American comfort food.
- Learn how to utilize simple pantry staples for a quick dinner.
- Master reliable cooking techniques for a perfect texture every time.
- Understand the historical significance of this beloved family meal.
- Enjoy a dish that blends vintage charm with modern convenience.
The Nostalgic Appeal of Tuna Loaf
The classic tuna loaf recipe is loved for turning simple ingredients into a tasty meal. It has been a staple at family dinners in the U.S. for years. It shows how cooking used to be about making something warm and inviting with basic items.

classic tuna loaf recipe
Why This Retro Dish Remains a Kitchen Staple
The retro tuna loaf dish is still popular today because it’s affordable and easy to make. It turns canned goods into a filling meal that’s great for groups without costing much.
Several reasons make it a favorite in homes:
- Pantry Accessibility: You probably have all the ingredients already.
- Budget-Friendly: It’s a protein-rich meal that’s easy on the wallet.
- Family-Friendly: Its mild taste is loved by kids and adults alike.
The Comforting Texture and Flavor Profile
The classic tuna loaf recipe offers a unique taste and texture. The mix of fish and binders makes it perfectly moist and easy to slice.
This retro tuna loaf dish has a mild, savory taste that’s comforting. It’s not too fishy, thanks to aromatic spices that add depth. Serving this dish is like sharing a piece of history that values simple, honest ingredients.
Essential Ingredients for Your Old Fashioned Tuna Loaf Meatloaf
To make a traditional tuna meatloaf, you need the right ingredients. Choosing high-quality items is key. This ensures your meatloaf turns out moist and delicious every time.
Core Components for the Perfect Base
The base of a great loaf starts with quality canned fish. Choose solid white albacore in water for a clean taste. A good binder is also crucial to keep the loaf together while it cooks.
- Canned Tuna: Two 5-ounce cans, thoroughly drained.
- Breadcrumbs: Plain or panko crumbs provide the necessary structure.
- Eggs: Large eggs act as the primary glue for your ingredients.

old fashioned tuna loaf meatloaf
Flavor Enhancers and Aromatics
A old fashioned tuna loaf meatloaf shines with fresh aromatics. Finely diced onions and crisp celery add a sweet touch and crunch. These balance the softness of the fish.
Don’t forget the power of fresh herbs. Chopped parsley or dill bring a bright, herbaceous flavor. A bit of Worcestershire sauce or lemon juice can also deepen the taste.
Substitutions and Optional Add-ins
This classic recipe is flexible. You can adjust it to fit your needs or dietary preferences. This way, you can enjoy the meal without compromising on taste.
Dairy-Free and Gluten-Free Alternatives
Managing dietary restrictions is easy with simple swaps. Use gluten-free oat flour or crushed gluten-free crackers for a gluten-free version. For dairy-free, add unsweetened almond milk or olive oil instead of butter or cream.
Adding Texture with Vegetables and Herbs
Adding extra vegetables to your traditional tuna meatloaf boosts nutrition and color. Try adding grated carrots or sautéed bell peppers. These add a fresh, vibrant touch and a nice texture contrast to the tuna.
Understanding Prep and Cooking Times
Getting the timing right is key to a perfect meal. When making a traditional tuna meatloaf, planning ahead helps. It makes cooking a fun, family-friendly activity.
Breaking Down the Timeline
This recipe takes exactly one hour to complete. You’ll spend 15 minutes preparing, like chopping and mixing. The rest, 45 minutes, is for baking in the oven.
This quick baking time is crucial for fish-based meatloaves. It helps keep the meat moist and flavorful. This schedule lets you manage your sides while the meatloaf cooks.
Why Patience Matters in the Kitchen
Patience is crucial when making a traditional tuna meatloaf. Rushing can make the center soft or crumbly. Giving it 45 minutes ensures it’s firm and holds together.
Don’t cut into the loaf right away after baking. Letting it rest a bit makes it easier to slice. Being patient ensures your dish looks great and tastes even better.
Preparing Your Ingredients for Success
Getting your ingredients ready is key to a great vintage tuna loaf recipe. Taking the time to prepare each part ensures your dish stays tasty and holds together while baking.
Selecting the Right Canned Tuna
The quality of your tuna is crucial. You can pick tuna in water or oil, based on whether you like it moist or rich.
Tuna in oil gives a richer mouthfeel. Water-packed tuna tastes cleaner. Choose high-quality cans to avoid bad tastes.
| Tuna Type | Moisture Level | Flavor Profile | Best Use |
| Water-Packed | Low | Neutral | Health-conscious loaves |
| Oil-Packed | High | Rich/Savory | Moist, tender loaves |
| Solid White | Medium | Mild | Firm, structured loaves |
Properly Draining and Flaking the Fish
After picking your tuna, drain it well. Too much moisture makes the loaf soggy. Use a fine-mesh sieve to remove all liquid.
Put the drained fish in a bowl and flake it with a fork. Make sure it’s not too fine, so it stays chunky.
Measuring and Prepping Your Binding Agents
Binding agents like breadcrumbs and eggs keep your loaf together. It’s important to measure them right. Too little, and it falls apart. Too much, and it’s too dense.
Measure your breadcrumbs carefully and whisk your eggs in a separate bowl. Then add them to the mix. This helps your vintage tuna loaf recipe turn out even and slice well.
Mixing and Shaping the Perfect Loaf
Now it’s time to mix your ingredients. This is where the magic happens. Precision and patience are key as you start.
Combining Ingredients Without Overworking
Start by mixing gently with a spatula or your hands. Don’t mash too hard. This can make the tuna dense. Gentle handling keeps the loaf light and fluffy.
“Cooking is at once child’s play and adult joy. And cooking done with care is an act of love.”
Craig Claiborne
Achieving the Ideal Consistency
The mixture should hold its shape but not be hard. If it’s too dry, add a bit of milk. A good vintage tuna loaf recipe needs this balance to stay moist.
Shaping the Loaf for Even Baking
Put the mixture in your loaf pan. Press it down firmly to remove air pockets. Uniformity is key; smooth the top and make the edges even for even baking.
Shaping your loaf carefully ensures a professional result. This simple step turns your vintage tuna loaf recipe into a comforting masterpiece ready for the oven.
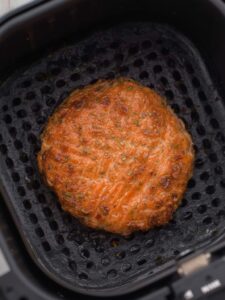
Baking Techniques for a Golden Crust
Getting the oven right is key to a moist and tasty homemade tuna loaf. The prep work is important, but the oven’s heat makes the loaf’s texture and look.
Setting the Oven Temperature
Most recipes need a temperature of 350°F to 375°F for the homemade tuna loaf. This heat cooks the inside well without burning the outside too soon.
Preheat your oven for at least twenty minutes before baking. This ensures the loaf cooks evenly and gets that golden crust you want.
Using the Right Pan for Even Heat Distribution
The pan’s material affects how heat spreads through the mix. Metal pans are best because they heat up fast, making the bottom and sides crispy.
For glass pans, the heat stays longer, so you might need to lower the temperature a bit. Always grease or line the pan to prevent sticking.
Monitoring Doneness and Avoiding Dryness
Watch the clock closely in the last ten minutes to prevent dryness. A well-cooked loaf should feel firm and slightly pull away from the pan.
Use an instant-read thermometer to check the center; it should be about 160°F. Letting it rest for five to ten minutes after baking helps keep it moist.
| Baking Factor | Recommended Setting | Benefit |
| Oven Temperature | 350°F – 375°F | Even cooking |
| Pan Material | Light-colored metal | Crispy crust |
| Internal Temp | 160°F | Food safety |
| Resting Time | 5-10 Minutes | Moisture retention |
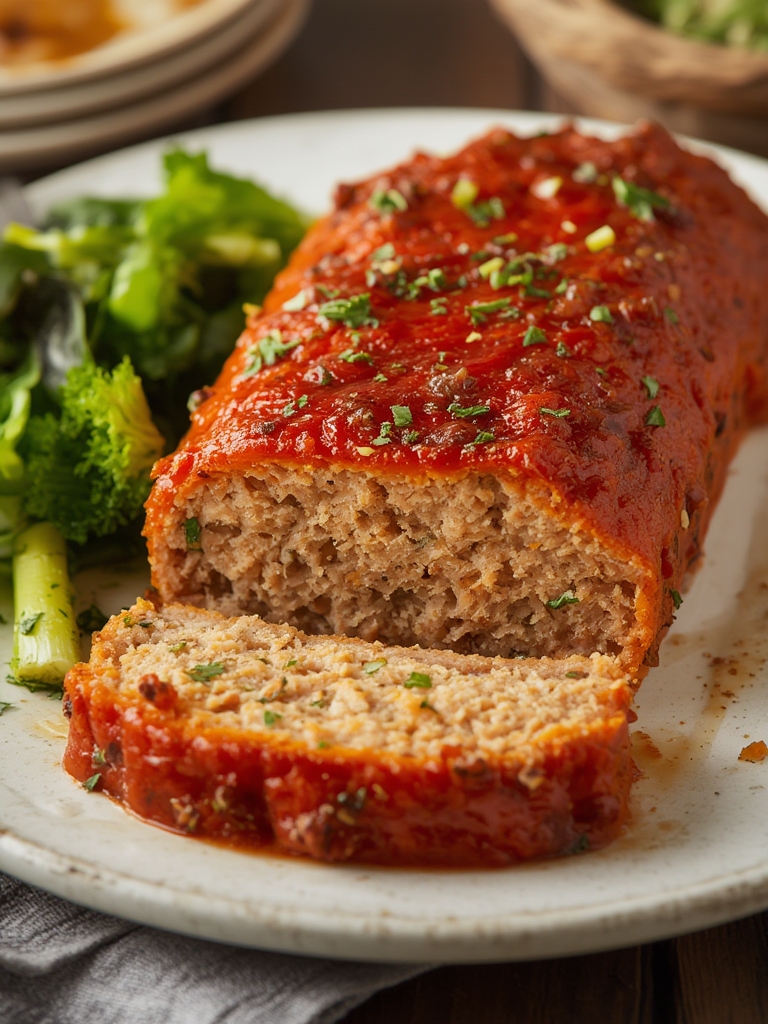
Serving Suggestions and Classic Pairings
Turning a simple dinner into a memorable feast is all about the right sides and sauces. When you make a classic tuna loaf recipe, aim to balance its savory, dense texture. Add lighter or creamier elements to make the meal feel both nostalgic and satisfying.
Traditional Sides That Complement the Loaf
For a balanced plate, choose sides that contrast in texture. Creamy mashed potatoes are a timeless favorite because they pair well with the loaf’s firmness. Roasted root vegetables or steamed green beans add a fresh, crisp touch to your meal.
For a lighter option, a crisp garden salad with tangy vinaigrette is perfect. The dressing’s acidity cuts through the fish’s richness, refreshing your palate. These sides make sure your old school tuna meatloaf shines while offering a complete meal.
Creating a Savory Sauce or Gravy
A sauce is key to keeping every bite moist and flavorful. A simple white sauce, or Béchamel, can be enhanced with fresh dill or lemon zest. This creamy addition brings out the tuna’s delicate flavor without overpowering it.
For a deeper flavor, try a savory mushroom gravy. Whisk it together with pan drippings or vegetable broth. This liquid prevents the loaf from drying out and adds a sophisticated finish to your dinner.
| Side Dish Category | Recommended Option | Flavor Benefit |
| Starch | Garlic Mashed Potatoes | Adds creaminess and comfort |
| Vegetable | Steamed Green Beans | Provides a fresh, crisp crunch |
| Sauce | Lemon-Dill Cream Sauce | Enhances moisture and brightness |
| Salad | Garden Green Salad | Balances richness with acidity |
Storing and Reheating Your Leftovers
Managing leftovers right keeps your meal as tasty as the first time. When you make a homemade tuna loaf, you want every slice to stay moist and flavorful. This is important for your next meal.
Proper Storage Methods for Freshness
Let your dish cool down completely before refrigerating it. Wrap it tightly in plastic wrap or foil to avoid bad smells from other fridge items.
Store leftovers in an airtight container for the best results. This keeps the moisture locked in and saves the texture of your easy tuna loaf recipe. Stored right, it stays fresh for up to three days.
“The secret to a great leftover meal is treating it with the same care you gave it when it first came out of the oven.”
Best Practices for Reheating Without Drying Out
Reheating needs care to avoid a rubbery texture. The oven is best for a perfect crust. Place a slice on a baking sheet, cover with foil, and heat at 300°F until warm.
If you’re short on time, the microwave works well for your easy tuna loaf recipe. Use a microwave-safe dish, cover with a damp paper towel, and heat on low. This prevents drying out the fish.
| Method | Temperature/Setting | Estimated Time | Best For |
| Oven | 300°F | 10-15 Minutes | Maintaining Crust |
| Microwave | 50% Power | 1-2 Minutes | Quick Reheating |
| Air Fryer | 320°F | 3-5 Minutes | Crispy Edges |
By following these steps, you can enjoy your homemade tuna loaf all week. Keeping your storage habits consistent ensures a great dining experience every time.
Conclusion
Learning to make a classic meal connects you to many home cooks before you. They loved simple, hearty ingredients. Now, you can make an old school tuna meatloaf that’s full of comfort.
This easy tuna loaf recipe is great for your meal planning. You can change the flavors to fit your taste while keeping the dish’s tradition.
Your kitchen is the best place to try these nostalgic flavors. Share your tuna meatloaf with family or friends. It keeps the tradition alive in your home. Every slice is a taste of history and a warm meal.
Make the recipe your own by adding your twist. Share photos of your tuna meatloaf on social media. It inspires other home cooks. Enjoy making a meal that lasts through time.
FAQ
What is the best type of canned tuna to use for an old fashioned tuna loaf meatloaf?
For the best taste, choose high-quality canned tuna from brands like StarKist or Bumble Bee. Chunk light tuna makes the loaf soft, while solid white albacore gives it a meaty texture. Make sure to drain the liquid well to keep the loaf firm.
How can I prevent my traditional tuna meatloaf from falling apart during slicing?
To make a firm tuna loaf, mix eggs and breadcrumbs correctly. Use Progresso Italian Style Bread Crumbs for the best results. Let the loaf rest for 10 minutes after baking to ensure perfect slices.
Can I make this classic tuna loaf recipe if I have a gluten allergy?
Yes, you can make a gluten-free tuna loaf. Use Ian’s Gluten-Free Panko or crushed gluten-free crackers instead of breadcrumbs. Make sure your Worcestershire Sauce is gluten-free too.
What are the recommended side dishes for a retro tuna loaf dish?
Serve your tuna loaf with classic American sides for a full experience. Try creamy mashed potatoes, steamed sweet peas, or a crisp wedge salad. These sides complement the tuna’s savory flavor.
How should I store and reheat leftovers of my homemade tuna loaf?
Wrap leftovers tightly in Reynolds Wrap or store them in an airtight container in the fridge for up to three days. Reheat in a 300°F oven or microwave on medium, adding a bit of mayonnaise to keep it moist.
Why is it important to flake the fish before mixing the traditional tuna meatloaf?
Flaking the tuna ensures it’s evenly mixed, preventing clumps that can make the loaf crumble. This way, the flavors of onions and celery blend well in every bite.
Can I add a topping to my vintage tuna loaf recipe?
Yes, you can. Top your tuna loaf with Heinz Ketchup or a lemon butter mix before baking. This adds a sweet and tangy glaze that complements the tuna’s saltiness.